How to copy HTML into the Email Designer

How to copy HTML from the Visual Editor into the Email Designer

  1. Write or paste your email content into the Visual Editor and copy HTML into the clipboard:
  2. Open the Email Designer page and add a text field to your email design:
  3. Paste the HTML into the text field code by clicking the <> icon:
  4. Remove any HTML you have in the Source Code, paste your HTML from the clipboard, and click the Save button:
  5. After that, you will see your HTML content in the Email Designer:

This is useful if you have an email written in a MS Word document and you want to convert it to email format (HTML table). You can just copy and paste the Word document contents into the Visual Editor and then copy the HTML into the Email Designer.

Please note that you should not embed images in HTML emails. Gmail will not display embedded images, and Outlook or Yahoo Mail may also have issues displaying them.

How to convert a complex Word document and show it in WordPress

Converting a complex Word document to HTML and showing it on your existing website may not be easy. If you want to display a complex document with extensive custom styling on your website (for example, in WordPress) without major design issues, please try this solution.

  1. On the WordToHTML.net upload & convert your document with the Embed images and the Full page mode turned on:
  2. Then you download the converted HTML file:
  3. After that, you upload that HTML file into your WordPress Media Library:
  4. Now you need to get the URL of the uploaded HTML file. You can do that by clicking on this demo.html in the Media Library and copying the URL of this HTML to the clipboard. Then paste it into a notepad to use it later:

  5. Now you can create a post or page in WordPress and copy & paste the iframe HTML code shown below in the WordPress Code editor. In the src attribute, you need to enter the URL of the HTML file from Notepad. You can also enter a page title you want.
    <iframe style="border: none; width: 100%; height: 100vh;" title="Title of the page" src="https://wordtohtml.net/content/wp-content/uploads/demo.html" frameorder="0"></iframe>


    If you’re using the new WordPress block editor, you can switch to code view like this:

  6. Then you can you can publish this page and view it in a browser. Example page looks like this…

Please note that if your converted HTML page is long, the browser will show this page with a scrollbar on the right side. This is how an IFRAME renders in browsers. Unfortunately, there is no easy way to fix this. Also, please note that Google or any other search engine will index the URL of the HTML file from the WordPress Media Library. The parent page might get a hint of that content, but Google doesn’t treat it as if it were inline. From an SEO perspective, an iframe is basically saying: “Here’s another page inside mine.” It doesn’t merge ranking signals.

So if you want the content to help the parent page rank, you should place HTML directly in the page. IFrames are fine for embedding complex Word documents, but weak for SEO. If your goal is purely presentation, an iframe is okay. If your goal is indexing/ranking, serve the content inline.

The good thing is that you can modify your source Word document, convert it again on WordToHTML.net, and delete the existing HTML file from the WordPress Media Library and upload the newly converted HTML file again. If you keep the same HTML file name, you will not have to change anything on the page with an iframe HTML code.


Keep in mind that if your document has many big images and you convert it with the Embed images option turned on, the converted HTML file may be very big (many megabytes), and it could load slowly on your website. In this case, we recommend converting the document without embedding images in HTML:

Then you download HTML with media files:

Now enter the URL of the images folder on your website, by default WordPress is storing images in /wp-content/uploads/, and then you click the Next button to download a zip file with HTML and all the images.

Then you unzip the downloaded file and copy the HTML file and images to your WordPress Media Library. The rest of the process is the same (copy URL to the clipboard and add it to an iframe code)…


This “iframe solution” can work on any other website as well. It’s not only for WordPress. The main thing is to upload the converted HTML file to your website (either via your website admin panel or directly via FTP). Then, just enter the iframe code mentioned above with the correct HTML file URL on the webpage that needs to show that converted HTML file.

Visual Editor keyboard shorcuts

If you want to quickly change a sentence or selected text to a heading, you can press Ctrl+Shift+1…6 on your keyboard in the Visual Editor, and the editor will automatically apply the heading.

Below you can see the list of all shortcuts for our default Visual Editor:

Inline Editor

Ctrl + E or ⌘ Cmd + E

Shows the editor when inline mode is set to true.

Common Actions

Ctrl + C or ⌘ Cmd + C

Copies selection from the editable are to clipboard.

Ctrl + X or ⌘ Cmd + X

Cuts the selection from the editor to clipboard.

Ctrl + V or ⌘ Cmd + V

Pastes from clipboard.

Ctrl + V or ⌘ Cmd + V

Ctrl + Z or ⌘ Cmd + Z

Same effect as clicking on the Undo button in the editor.

Ctrl + Y or ⌘ Cmd + ⇧ Shift + Z

Same effect as clicking on the Redo button in the editor.

Ctrl + K or ⌘ Cmd + K

Opens the insert link popup to insert a link in the editable area.

Ctrl + P or ⌘ Cmd + P

Opens the insert image popup to insert an image in the Javascript rich text editor.

Basic Formatting

Ctrl + A or ⌘ Cmd + A

Selects all text in the editable area of the Froala Rich Text Editor.

Ctrl + B or ⌘ Cmd + B

Same effect as clicking on the Bold button in the editor.

Ctrl + I or ⌘ Cmd + I

Same effect as clicking on the Itallic button in the editor.

Ctrl + U or ⌘ Cmd + U

Same effect as clicking on the Underline button in the editor.

Ctrl + S or ⌘ Cmd + S

Same effect as clicking on the Strikethrough button in the editor.

Ctrl + ] or ⌘ Cmd + ]

Indents the current paragraph.

Ctrl + [ or ⌘ Cmd + [

Outdents the current paragraph.

Quote

Ctrl + ' or ⌘ Cmd + '

Increases the quote level. Same effect as selecting Quote > Increase from the rich text editor’s toolbar.

Ctrl + ⇧ Shift + ' or ⌘ Cmd + ⇧ Shift + '

Decreases the quote level. Same effect as selecting Quote > Decrease from the rich text editor’s toolbar.

Image / Video

Ctrl + + or ⌘ Cmd + +

Resizes larger the current selected image or video.

Ctrl + - or ⌘ Cmd + -

Resizes smaller the current selected image or video.

Table

Ctrl + Alt + Space

Selects table cell in which the cursor pointer is.

⇧ Shift + Left / Right arrow

Extend table cell selection with one cell to the left or to the right.

⇧ Shift + Up / Down arrow

Extend table cell selection with one cell up or down.

Navigation

Ctrl + / or ⌘ Cmd + /

Show shortcuts modal in the editor.

Alt + F10

Focus the opened popup or toolbar of the Javascript rich text editor.

Esc

Return focus to the previous position.

Base64 vs Hosted Images in HTML: Which One Should You Use?

When building modern websites or web apps, images play a critical role in design, branding, and user experience. However, how you include those images can affect performance, SEO, and maintainability. One common decision you face is whether to embed images as base64 directly in the HTML or link to image files hosted on a server.

In this post, we’ll break down the key differences between base64 and hosted images, their pros and cons, and when to use each.


🔍 What Is a Base64 Image?

A base64 image is a way of encoding image data as a text string. Instead of linking to a file like image.jpg, you embed the entire image directly in the src attribute using a data:

<img src="data:image/png;base64,iVBORw0KGgoAAAANSUhEUg..." />

This can be done in HTML or CSS and is often used for small icons, emails, or when external requests are restricted.


🌐 What Is a Hosted Image?

A hosted image is a traditional image file stored on your server or a CDN. The HTML uses a normal src attribute pointing to the file:

<img src="/images/logo.png" />

This method separates image files from your HTML and allows for browser caching, CDN optimisation, and easier content management.


⚖️ Base64 vs Hosted Images: Pros and Cons

✅ Base64 Embedded Images – Advantages

  • Reduces HTTP requests: Everything is bundled in one HTML file.
  • Useful in restricted environments: Great for emails or offline apps where external images may be blocked.
  • No broken links: Image data lives with the HTML; no risk of 404 errors.

❌ Base64 Embedded Images – Disadvantages

  • Increases HTML size: Base64 encoding can make the file a few times larger.
  • No browser caching: Each page load re-downloads the image.
  • Hard to manage: Not human-readable and painful to update or debug.
  • Bad for performance with large images.
  • Email clients issue: Gmail, Outlook, or Yahoo Mail will not display embedded images.

✅ Hosted Images – Advantages

  • Smaller HTML files: Faster initial page load.
  • Cacheable: Browsers can cache and reuse images across pages.
  • SEO benefits: Search engines can index images and display them in image search results.
  • Easy maintenance: Images can be updated without touching HTML.
  • Recommended for emails: email clients will display hosted images.

❌ Hosted Images – Disadvantages

  • Extra HTTP requests: Too many can slow down the page if not optimised.
  • Broken images: If files are moved or deleted, you’ll see 404s.

📌 When Should You Use Base64 Images?

Use base64 when:

  • You need a single self-contained HTML file (e.g., for offline use).
  • You’re including small images (like icons or logos) and want to reduce requests.

📌 When Should You Use Hosted Images?

Use hosted images when:

  • Building standard websites or web apps.
  • You want to take advantage of browser caching and CDN delivery.
  • You’re dealing with large images or multiple shared assets.
  • Designing emails.

🧠 Conclusion

There’s no one-size-fits-all answer, but here’s a quick rule of thumb:

👉 Use base64 for small, non-reusable images in limited environments.
👉 Use hosted images for everything else—especially for performance, scalability, and SEO.

Understanding when and how to use each method can make a big difference in how fast, reliable, and search-friendly your site is.

How to translate HTML or text to any language

How translation works:

  1. Upload, paste, or enter your content into the Visual Editor on WordToHTML.net and click on the Translate button icon below the Visual Editor.
  2. Select your input language or leave it to auto-detect and select the target language you want to convert to. You can press letters on your keyboard to jump on the list, eg press S to jump down to the languages starting with S. Then click the Preview button to get a preview of the translation or click the Translate button to translate your content and insert it into the Visual Editor.
  3. When you click the Preview button you will see a preview of the translation. You can now either copy the translation to the clipboard, download it, or edit it in the Visual Editor.

Please note that our website will store the last 20 translations ONLY in the browser that you have used to translate your content. Translation history is not being stored online.

Adding a signature into Outlook email client workaround

Adding your HTML signature into Outlook may require a small workaround. You can send an email with a signature from WordToHTML.net directly or copy & paste the signature HTML into your email client and send it to your email.

In Outlook, open the test email you just sent. In this email, select and copy the entire signature block to the clipboard, including images.

Paste the signature: Go to File > Options > Mail > Signatures. Create a new signature and paste the copied content from that email. This method should copy the image along with the text.

Create a new email in Outlook and send it to test out the signature.

How to use HTML email signature generator

How to create an HTML email signature with our signature generator tool in a few simple steps

  1. Open the Email Signature Generator on WordToHTML.net
  2. If you are signed in upload your photo or company logo otherwise enter a URL address to it.
  3. Select an option to see your photo on the left, right, top, or bottom (Photo Placement options just below the Photo URL field).
  4. Fill in all the signature contact details you need.
  5. Optionally add a banner image with an optional link (clicking on the banner will open the website URL you enter).
  6. Update your signature social profile links. It can be any icon URL and link if you like. If you don’t need it just select the None option from the Social Icons Placement.
  7. Style your signature as you like:
  8. If you are signed in save your signature online.
  9. Copy the signature HTML code to the clipboard ready for pasting into your email client (Gmail, Apple Mail, Outlook, Outlook Live, Thunderbird, Yahoo). We recommend using Chrome or Edge browser. Only Firefox browser version 127+ does support copying HTML format into the clipboard.
  10. Test your signature by creating a new email and sending it.
  11. Please note that you can customize your signature fully in our Visual and Code Editors. Just click the white ‘Edit in Visual Editor’ button (you need to be logged in).
  12. That’s it! You’ve successfully created your HTML signature. Also, feel free to send us any feedback…

Read about other ways of creating HTML email signatures on WordToHTML.net…

How to add a new HTML email signature in iOS iPhone or iPad

Adding your HTML signature to your mail on iPhone or iPad requires a small workaround.

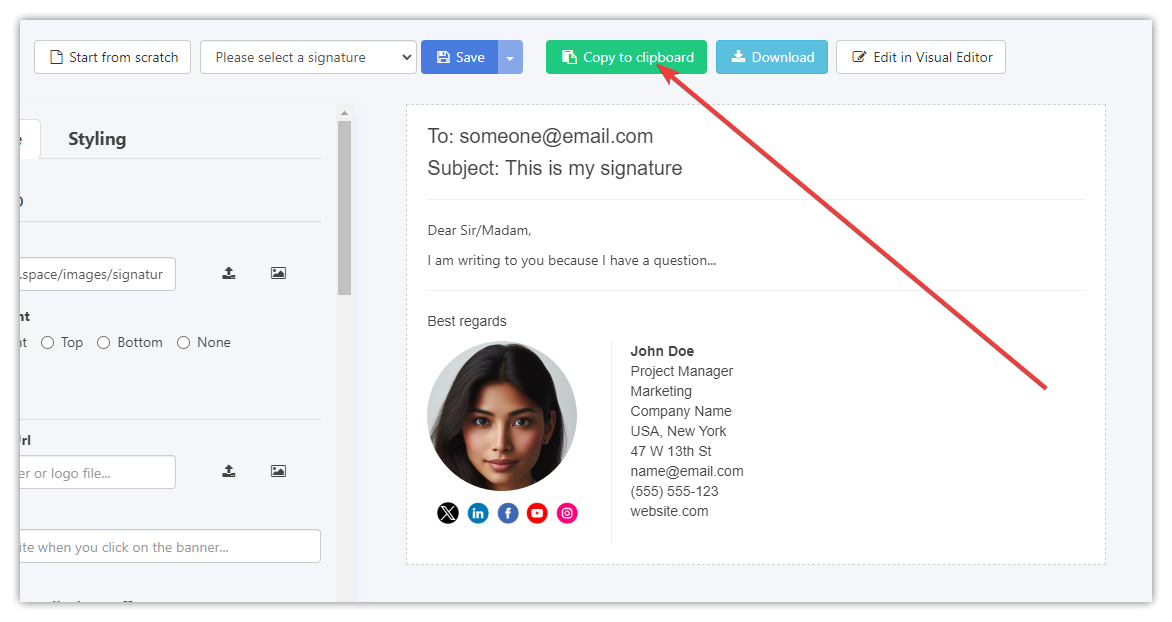
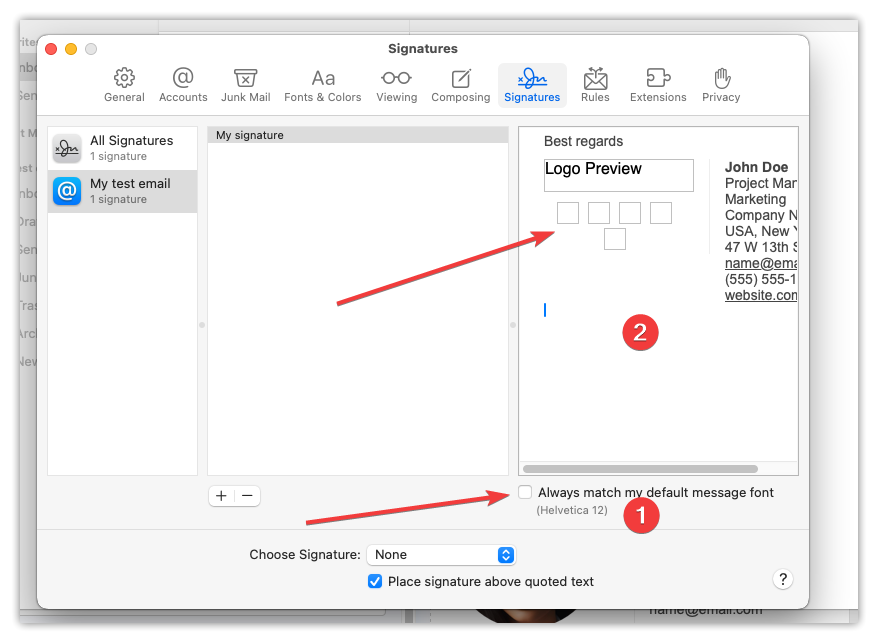
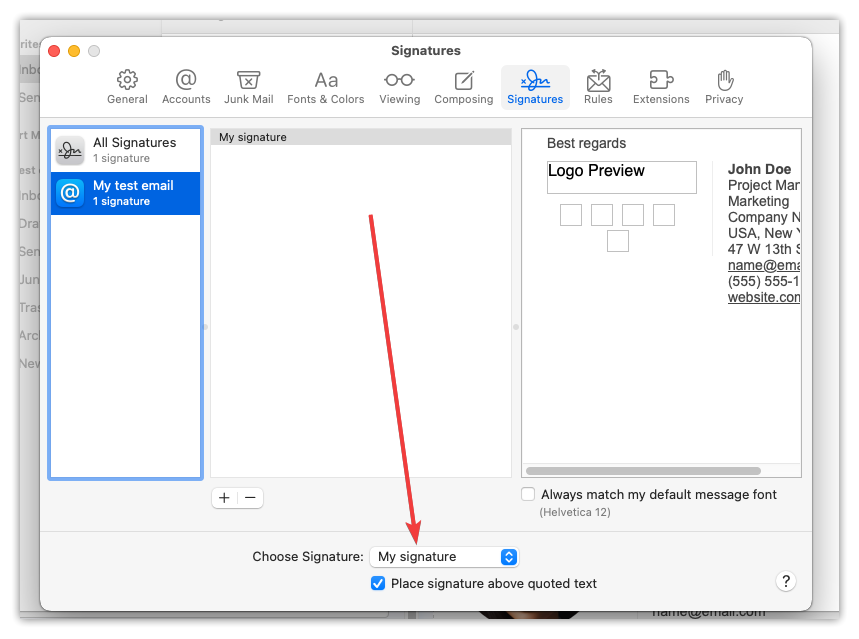
Paste the signature into your desktop or web email: Create a new email in your desktop or web email app. Paste the HTML Email signature you created with our tool, or if you already have the signature setup, that’s ok.

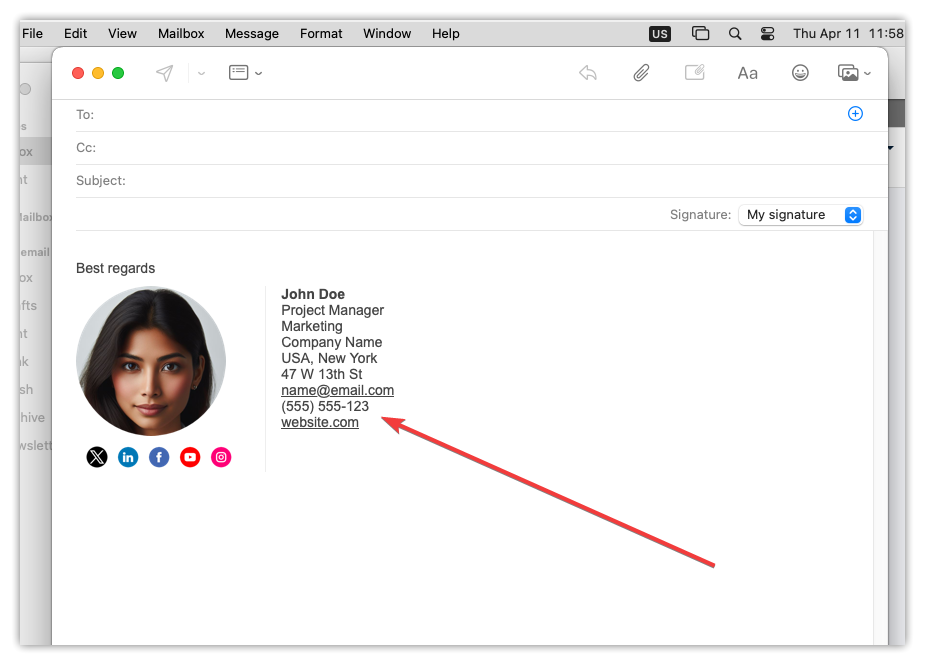
Send the email to yourself:  Send the test email to your iPhone’s email address.

Forward and copy the signature: On your iPhone, open the test email you just sent. Forward it to create a new email. In this new email view, copy the entire signature block, including the image.

Paste the signature: Go to Settings > Mail > Signature on your iPhone. Create a new signature and paste the copied content from the test email. This method should copy the image along with the text.

Tip: Copying the signature directly from the received email might not always capture the image. Forwarding it first ensures a more reliable copy process.

Send a test email from the mail app in iOS to test out the signature.

You can try out our HTML Email Signature Generator here…

How to add a new HTML email signature in the Outlook on Windows

Here’s a step-by-step guide on how to add a new HTML signature in the Outlook Windows 10/11 app by pasting the signature HTML from the clipboard:

  1. Copy the email signature from WordToHTML.net to the clipboard.
  2. Open Outlook: Launch the Outlook app on your Windows 10/11 computer.
  3. Access Settings: In the Outlook app, navigate to the ribbon at the top of the window. Click on the “File” tab located in the top-left of the window. This will open the File menu.
  4. Navigate to Options: In the File menu, click on “Options” located at the bottom of the list on the left-hand side. This will open the Outlook Options window.
  5. Go to Mail Settings: In the Outlook Options window, select the “Mail” category from the list on the left-hand side. This will display settings related to email handling.
  6. Access Signatures: Within the Mail settings, locate the “Signatures…” button, typically found in the “Compose messages” section. Click on it to access the signature settings.
  7. Create a New Signature: In the Signatures and Stationery window, click on the “New” button to create a new signature and enter its name.
  8. Paste HTML Signature from Clipboard: In the Edit Signature box, if you have your HTML signature copied to the clipboard, simply paste it into the text box. You can do this by right-clicking in the text box and selecting “Paste” from the context menu, or by pressing Ctrl + V (Windows) on your keyboard. Choose the default signature for the New messages.
  9. Save Changes: After pasting your HTML signature, click on the “OK” button to save your new signature.
  10. Test Your Signature: Compose a new email to test your HTML signature. It should automatically appear at the bottom of your email.
  11. Adjust as Needed: If your signature doesn’t display correctly or you want to make changes, return to the signature settings and edit your signature as necessary.

That’s it! You’ve successfully added a new HTML signature in the Outlook Windows 10/11 app.

If you experience issues with adding a signature into Outlook you can read this article.

How to add a new HTML email signature in the Outlook webapp

Here’s a step-by-step guide on how to add a new HTML signature in the Outlook web app and paste the signature HTML from the clipboard:

  1. Copy the email signature from WordToHTML.net to the clipboard.
  2. Open Outlook: Open your web browser and navigate to Outlook.live.com. Sign in with your Microsoft account if you’re not already signed in.
  3. Access Settings: Once you’re logged in, locate the gear icon in the upper-right corner of the Outlook interface. Click on it to open the settings menu.
  4. Navigate to Mail > Compose and reply: In the Settings menu, click on “Mail” from the left-hand navigation pane, then click on “Compose and reply” to access signature settings.
  5. Create a New Signature: Please enter your signature name.
  6. Paste HTML Signature from Clipboard: If you have your HTML signature copied to the clipboard, simply paste it into the text box. You can do this by pressing Ctrl + V (Windows) or Command + V (Mac) on your keyboard.
  7. Save Changes: After pasting your HTML signature and adjusting it as needed, scroll down and click on the “Save” button to save your new signature.
  8. Select default signatures: After saving please select your signature as a default one for the New Messages and for the Replies/Forwards:
  9. Test Your Signature: Compose a new email to test your HTML signature. It should automatically appear at the bottom of your email.
  10. Adjust as Needed: If your signature doesn’t display correctly or you want to make changes, go back to the signature settings and make adjustments as necessary.

That’s it! You’ve successfully added a new HTML signature in the Outlook web app by pasting the signature HTML from the clipboard.